-
Shop
- Advanced Technologies
- Beauty
- Best-Sellers
- Car Accessories
- Dating & Social Skills
- Digital Resources
- AI & Technology
- AI Skills
- Car Buying & Ownership
- Cozy Feast Collection
- Electronics & Technology
- Emotional Intelligence
- Financial Education
- Hobbies
- Home Styling & Organization
- Kitchen & Recipes
- Mindfulness
- Mindset
- Online Business
- Parenting & Child Development
- Pet Lifestyle & Wellness
- Positive Thinking
- Productivity
- Self Confidence
- Sleep Improvement
- Smart Life with AI
- Stress Management & Relaxation
- Travel Planning
- Yoga & Fitness
- Yoga & Mind-Body Practices
- Education & Learning
- Family & Parenting
- Fashion
- Fashion Accessories
- Furniture
- Gadgets
- Health & Beauty
- Health & Wellness
- Home & Garden
- Home Supplies
- Kids & Babies
- Kitchen
- Kitchen Best-Sellers
- Lighting
- Patio, Lawn & Garden
- Personal Growth
- Personal Style & Fashion
- Pet Care
- Pet Supplies
- Pets
- Sport & Outdoors
- Super Deals
- TikTok Growth & Monetization Mastery
- Travel
- Wealth
- Wealth Building
- Budgeting & Saving
- Cryptocurrency Investing
- Debt Management
- Entrepreneurship & Business Growth
- Family Finance & Budgeting
- Financial Independence
- Financial Mindset & Psychology
- Financial Planning
- Frugal Living & Expense Hacks
- Goal Setting
- High-Income Skills
- Investing Basics
- Leadership
- Motivation
- Networking & Mentorship
- Passive Income Strategies
- Real Estate Investing
- Side Hustles
- Stock Market Investing
- Wellness
- Popular
- Best deals
Mini Self-Adhesive Dashboard Hooks for Cables & Keys
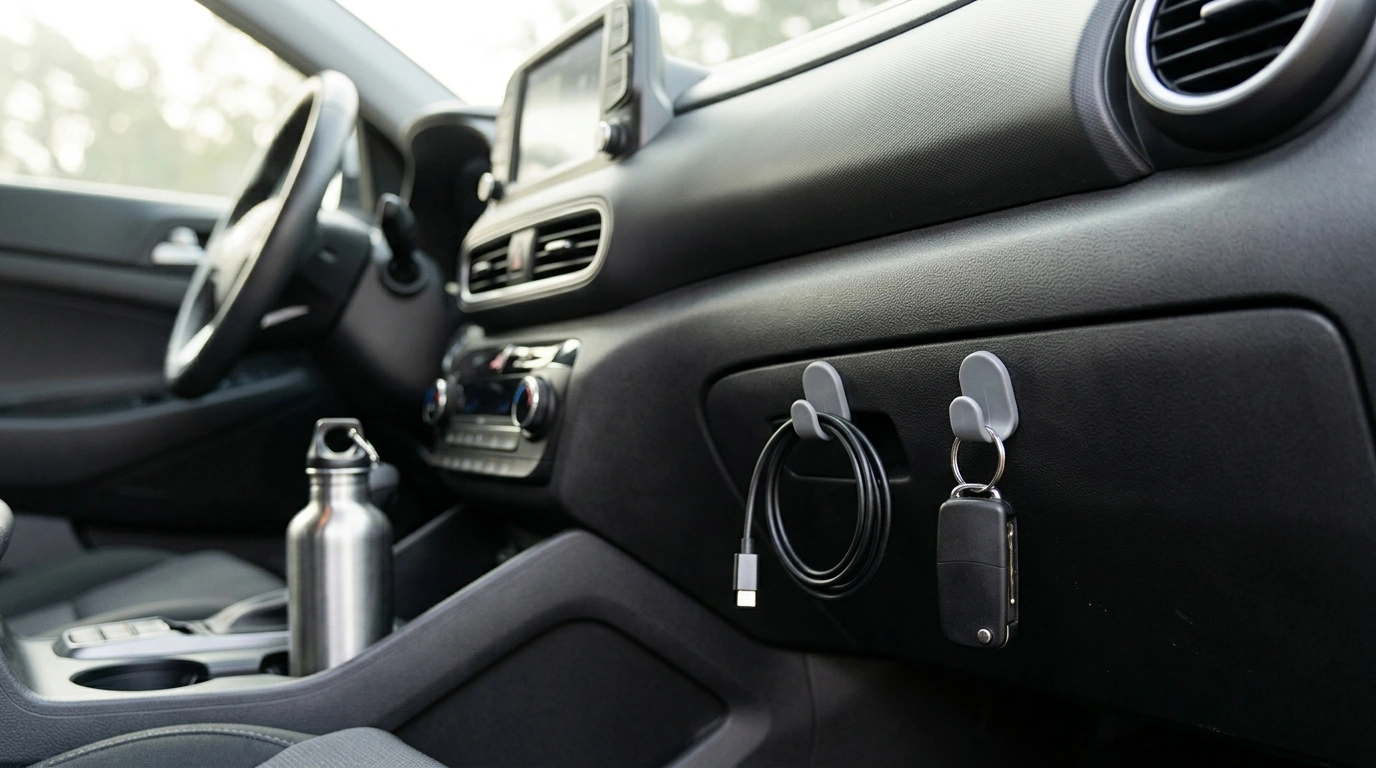
Mini Dashboard Hooks That Keep Cables and Keys Exactly Where You Need Them
Small clutter in a car turns into daily friction: charging cords sliding off the console, keys hiding under a seat, sunglasses rattling in the cupholder. Mini Car Dashboard Hooks add a simple, stick-on landing spot right where hands naturally reach—so the essentials stay visible, untangled, and easy to grab before the light turns green.
The everyday mess these mini hooks solve
Most in-car “mess” isn’t really mess—it’s a few high-use items with no consistent home. Our team likes mini adhesive hooks because they solve the little problems that keep repeating:
- Stops charging cables from dropping into the footwell or getting pinched in console gaps.
- Creates a consistent home for keys, parking cards, masks, or a small hand sanitizer—items that otherwise bounce around.
- Reduces fumbling and searching at stops, keeping attention on the road.
- Keeps frequently used items off seats and out of cupholders so drinks and storage stay usable.
- Adds organization without installing brackets, drilling, or using bulky visor clips.
If you’ve ever reached for a cable connector and come up empty while driving, it’s worth remembering that distraction adds up fast. For a helpful overview of why small distractions matter, see NHTSA’s distracted driving guidance.
Where these dashboard hooks work best
Placement is everything. You want easy reach without interfering with controls, screens, vents, or driver visibility. Here are the spots that typically work well:
- Dashboard edge near the center stack: convenient for a charging cable loop and quick access.
- Side of the center console: good for keeping a cable routed cleanly toward a phone mount or charging port.
- Lower dash area (driver or passenger side): helpful for light items like a key fob or mask straps.
- Near the infotainment area (without blocking screens/vents): keeps cords and small accessories within reach.
- Inside the glovebox door area: a tidy spot for a spare cable or compact items that shouldn’t roll around.
| Placement spot | Best for | Quick tip |
|---|---|---|
| Center stack side | Charging cable loop | Leave a small slack loop so the plug reaches your phone comfortably |
| Console side (passenger) | Aux/USB cable, small pouch | Keep items light so they stay secure on hot days |
| Lower dash (driver side) | Key fob, parking pass | Place where it won’t bump your knee while driving |
| Glovebox area | Spare cable, microfiber cloth | Use as a “return spot” so items go back after use |
| Near phone mount | Cable management | Route the cable along trim lines for a cleaner look |
Simple install that holds up better over time
Adhesive accessories usually fail for predictable reasons: dusty surfaces, oily interior protectants, or loading them too soon. If you want a mini hook to stay put through temperature swings, focus on the basics:
- Choose a clean, flat spot: a smooth surface gives adhesive the best contact and helps prevent edge lift.
- Clean and dry first: wipe away dust, protectant sprays, and oils so the adhesive bonds to the surface—not residue.
- Plan the direction: set the hook angle so items hang without swinging into controls or screens.
- Press firmly: apply steady pressure so the adhesive makes full contact with the dash surface.
- Give it time before loading: letting the adhesive settle helps it stay secure when the cabin heats up.
If you want deeper background on why surface prep matters (across adhesive types), 3M’s general guidance on bonding emphasizes clean, well-prepared surfaces: 3M (surface preparation and adhesive bonding basics).
Smart ways to use mini hooks for cables, keys, and more
Once your hook is in the right place, the “magic” is really just consistency. Pick a repeatable routine so you never wonder where something went:
- Cable parking: hang the cable end when not in use so it’s always in the same place.
- Two-hook routing: use one hook to guide the cable path and another as the resting point for the connector.
- Key handoff zone: set a hook as the drop spot when arriving—no more keys in the cupholder shuffle.
- Sunglasses backup: keep a lightweight pair secure without relying on the visor clip.
- Passenger-side organization: give small items a dedicated spot so they don’t migrate to the driver’s area.
A simple way to make this stick (literally and habit-wise): choose one hook to be “keys only” and don’t break the rule. The fewer decisions you make each trip, the calmer your cabin feels.
Care, removal, and safety notes for a tidy cabin
Our picks to get you organized (and keep it that way)
- Mini Car Dashboard Hooks – Self-Adhesive Interior Storage for Cables & Keys ($4.51) — a quick, low-commitment upgrade for cable ends, key fobs, and other light daily carry items.
- The Ultimate Employee Motivation Checklist: Spark Your Team’s Drive in 7 Easy Steps! (Printable PDF Download) ($3.99) — if you love systems, a checklist mindset helps you keep “return it to the hook” habits consistent, even on busy weeks.
A small upgrade that makes every drive feel more organized
FAQ
Will these dashboard hooks hold a charging cable and key fob securely?
Yes—mini dashboard hooks are intended for light everyday items like charging cables and key fobs. For the best hold, clean and fully dry the surface, press firmly during install, and allow time before loading; avoid hanging heavier items.
Where should dashboard hooks NOT be placed?
Don’t place hooks in airbag deployment areas or anywhere they could block vents, screens, or driver visibility. Avoid spots that interfere with steering, pedals, or your knees, and test reach and clearance while parked.
How do you remove an adhesive hook without damaging the dashboard?
Remove it slowly and carefully rather than ripping it off, so you don’t pull on dash coatings. Clean any residue gently and skip harsh chemicals; if you remount, use fresh adhesive for a reliable bond.














Leave a comment