-
Shop
- Advanced Technologies
- Beauty
- Best-Sellers
- Car Accessories
- Dating & Social Skills
- Digital Resources
- AI & Technology
- AI Skills
- Car Buying & Ownership
- Cozy Feast Collection
- Electronics & Technology
- Emotional Intelligence
- Financial Education
- Hobbies
- Home Styling & Organization
- Kitchen & Recipes
- Mindfulness
- Mindset
- Online Business
- Parenting & Child Development
- Pet Lifestyle & Wellness
- Positive Thinking
- Productivity
- Self Confidence
- Sleep Improvement
- Smart Life with AI
- Stress Management & Relaxation
- Travel Planning
- Yoga & Fitness
- Yoga & Mind-Body Practices
- Education & Learning
- Family & Parenting
- Fashion
- Fashion Accessories
- Furniture
- Gadgets
- Health & Beauty
- Health & Wellness
- Home & Garden
- Home Supplies
- Kids & Babies
- Kitchen
- Kitchen Best-Sellers
- Lighting
- Patio, Lawn & Garden
- Personal Growth
- Personal Style & Fashion
- Pet Care
- Pet Supplies
- Pets
- Sport & Outdoors
- Super Deals
- TikTok Growth & Monetization Mastery
- Travel
- Wealth
- Wealth Building
- Budgeting & Saving
- Cryptocurrency Investing
- Debt Management
- Entrepreneurship & Business Growth
- Family Finance & Budgeting
- Financial Independence
- Financial Mindset & Psychology
- Financial Planning
- Frugal Living & Expense Hacks
- Goal Setting
- High-Income Skills
- Investing Basics
- Leadership
- Motivation
- Networking & Mentorship
- Passive Income Strategies
- Real Estate Investing
- Side Hustles
- Stock Market Investing
- Wellness
- Popular
- Best deals
USB Mic Kit Upgrade: Boom Arm, RGB & One-Tap Mute
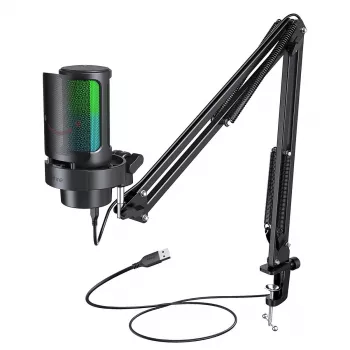
USB sound that’s easier to live with every day
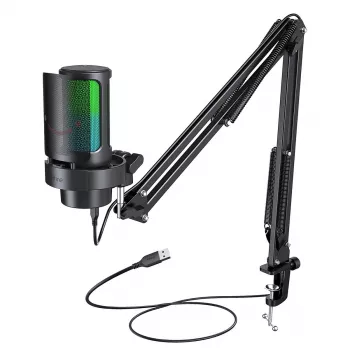
Clear voice is one of the fastest upgrades you can make for streams, calls, and recordings—and the difference is often less about complicated gear and more about a setup that’s easy to position, quick to control, and consistent day to day. Our USB microphone kit pairs a boom arm for proper placement, RGB lighting for a clean desk look, and a simple mute control for on-the-fly moments when you need silence instantly. For more guidance, see Best microphone for gaming in 2026: from streaming to ….
If you’ve been relying on a headset mic or a tabletop USB mic that sits too far away, this kind of kit helps you get closer to broadcast-style clarity without turning your desk into a studio.
What this kit is built to solve
- A cleaner, more consistent sound by getting the mic closer to your mouth (without blocking your screen).
- Less desk clutter and fewer bumps compared with a tabletop mic that sits in your workspace.
- Fast control during live moments with a dedicated mute function for coughs, side conversations, or quick resets.
- A streaming-ready aesthetic with RGB lighting that looks intentional on camera.
Dialing in placement: the boom arm advantage
A boom arm is the “comfort feature” that also improves your audio. Instead of placing a mic on your desk and speaking across the room, you can bring it to the same spot every session—right where your voice is strongest and your room noise is weakest.
- Position the mic so it sits 6–10 inches from your mouth, slightly off-center (aimed toward the corner of your mouth) to reduce harsh breath noise.
- Keep the mic out of frame while still close enough for a full, present voice—especially helpful for gaming streams and webcam setups.
- Use the arm to maintain the same mic distance every session; consistent distance typically means consistent volume for your audience.
- Route the cable along the arm to keep your desk clear and reduce accidental tugs.
Quick placement guide for common setups
| Use case | Where to place the mic | Why it helps |
|---|---|---|
| Live streaming | Just below mouth level, angled upward, 6–10 inches away | Keeps the mic close without blocking camera framing |
| Gaming + headset | To the side of your keyboard, aimed at the mouth corner | Reduces key/desk noise reaching the capsule |
| Video calls | Slightly above desk height, off-center | Natural tone with less “boomy” proximity effect |
| Voiceover / narration | Closer end of the range, angled off-axis | More detail and presence while softening plosives |
Mute control: the one feature streamers use constantly
Mute is one of those small controls you end up using more than you expect, because live audio is full of little moments you don’t want amplified. A dedicated mute control makes those moments quick and predictable—no hunting for the right window or slider.
- Instant mute is a workflow feature, not a luxury—use it when you need to cough, take a sip, or talk off-stream.
- Build a habit: mute before moving the boom arm, adjusting your chair, or repositioning your keyboard to avoid transmitting bumps.
- Pair mute control with software hotkeys (streaming app or chat app) for a double layer of confidence when live.
RGB lighting that fits a stream setup (without overcomplicating it)
For creators who are on camera, a mic is often part of the shot. RGB lighting can help your desk look intentional, especially when your room lighting is dim or you’re framing a tight scene around your keyboard and face cam.
- RGB adds visual polish for on-camera desks, especially in low-light rooms where the mic is visible in frame.
- Match lighting color to your overlay or room lights for a cohesive look.
- If you prefer a minimal vibe, choose a single steady color rather than fast animations to keep the focus on your content.
A simple setup routine for better sound on day one
You don’t need a complicated audio chain to sound better fast—you need repeatable placement, sensible levels, and fewer accidental noises.
- Mount the boom arm securely and place the mic so it can reach your speaking position without stretching or drifting.
- Set input levels in your system or streaming app so normal speech sits comfortably below clipping; then do a loud laugh test.
- Use a consistent speaking position: adjust the arm to meet you, rather than leaning toward the mic mid-stream.
- Reduce noise sources: keep the mic aimed away from fans or PC exhaust when possible, and avoid tapping the desk during live segments.
Who this kit is ideal for
In-stock picks from our team
- USB microphone kit with boom arm, RGB lighting & mute control — $64.32
- Understanding Attachment Theory for Parents – A Practical Parenting Guide (Digital Download) — $8.99
- The Ultimate Employee Motivation Checklist (Printable PDF Download) — $3.99
Product page
FAQ
How close should the microphone be for streaming?
Keep the mic about 6–10 inches from your mouth, and aim it slightly off-center toward the corner of your mouth. That distance helps you stay full and clear while reducing plosives and making your volume more consistent.
Does a boom arm really improve audio quality?
Yes—because it lets you place the microphone closer and keep that distance consistent every session. Closer placement generally means the mic captures more of your voice and less of your room compared with a desk mic sitting farther away.
When should the mute control be used during a live stream?
Use mute any time you cough, drink, need to speak off-stream, or you’re about to move the boom arm or adjust your chair. Many streamers also pair it with software mute hotkeys for extra peace of mind.











Leave a comment