-
Shop
- Advanced Technologies
- Beauty
- Best-Sellers
- Car Accessories
- Dating & Social Skills
- Digital Resources
- AI & Technology
- AI Skills
- Car Buying & Ownership
- Cozy Feast Collection
- Electronics & Technology
- Emotional Intelligence
- Financial Education
- Hobbies
- Home Styling & Organization
- Kitchen & Recipes
- Mindfulness
- Mindset
- Online Business
- Parenting & Child Development
- Pet Lifestyle & Wellness
- Positive Thinking
- Productivity
- Self Confidence
- Sleep Improvement
- Smart Life with AI
- Stress Management & Relaxation
- Travel Planning
- Yoga & Fitness
- Yoga & Mind-Body Practices
- Education & Learning
- Family & Parenting
- Fashion
- Fashion Accessories
- Furniture
- Gadgets
- Health & Beauty
- Health & Wellness
- Home & Garden
- Home Supplies
- Kids & Babies
- Kitchen
- Kitchen Best-Sellers
- Lighting
- Patio, Lawn & Garden
- Personal Growth
- Personal Style & Fashion
- Pet Care
- Pet Supplies
- Pets
- Sport & Outdoors
- Super Deals
- TikTok Growth & Monetization Mastery
- Travel
- Wealth
- Wealth Building
- Budgeting & Saving
- Cryptocurrency Investing
- Debt Management
- Entrepreneurship & Business Growth
- Family Finance & Budgeting
- Financial Independence
- Financial Mindset & Psychology
- Financial Planning
- Frugal Living & Expense Hacks
- Goal Setting
- High-Income Skills
- Investing Basics
- Leadership
- Motivation
- Networking & Mentorship
- Passive Income Strategies
- Real Estate Investing
- Side Hustles
- Stock Market Investing
- Wellness
- Popular
- Best deals
Plan a Miniature Village: Scale, Layout, Lighting
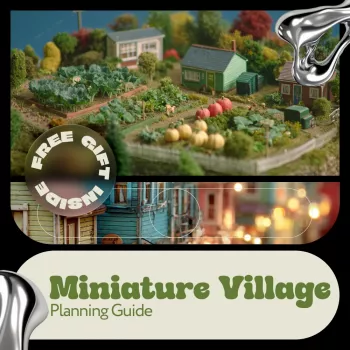
Miniature Village Planning Guide: From Concept Sketch to Finished Display
A miniature village feels cohesive when the scale, layout, and scenery are decided before any building starts. A little planning up front helps every house, tree, and street “belong” in the same world—while also making the finished display easier to store, transport, refresh, and expand over time. The flow below is beginner-friendly and practical: lock in a concept, choose a footprint, map streets and sightlines, pick materials, build in stages, landscape for realism, and finish with lighting and display protection.
Start With a Clear Village Concept
Begin by choosing one primary theme (coastal town, alpine hamlet, holiday market, fantasy, or historical main street) and one supporting detail such as season, era, weather, or time of day. That supporting detail is what keeps choices consistent when you’re tempted by “one more” building that doesn’t quite match.
Next, pick a simple “story moment” to guide decisions: market morning, first snow, harvest day, a festival, or a quiet evening with lit windows. Then define 3–5 must-have elements (for example: town square, bakery, bridge, station, church, waterfront, woodland edge) and 3–5 nice-to-haves for later expansion.
Keep references tight: a set of 10–20 images is usually enough. Too many references often leads to mixed rooflines, mismatched trims, and inconsistent street widths. Finally, decide your viewing style: front-facing shelf display, 360° tabletop, or a wall-mounted shadowbox. That single decision changes everything from roof detailing to where you hide wiring.
Choose Scale, Footprint, and a Simple Growth Plan
Select a scale and stick to it. Mixing scales is the fastest way to break realism—unless you’re intentionally stylizing. If you’re using model-train accessories, it helps to understand common standards and sizing conventions; the National Model Railroad Association (NMRA) is a reliable reference point for many hobby scales.
Measure your display area and commit to a base footprint with a small buffer zone for borders, lighting wires, and protective edging. Even a half-inch perimeter can make the difference between a scene that looks finished and one that looks like it’s “spilling off” the edge.
Plan for growth now, not later. Modular expansion is usually the easiest approach: multiple smaller bases that lock together, or a main base with swappable inserts (like seasonal snow mats or a removable market area). Set a budget and timeline per phase—base and roads first, buildings next, landscaping after, lighting and micro-details last—so you’re not forced into redoing finished work.
Lay Out Streets, Paths, and Sightlines Before Building
Sketch a top-down map and create zones: residential, commercial, civic, natural areas, plus transition edges (hedges, fences, or tree lines). Decide your “main view” (hero angle) and “secondary view” so the village reads well from more than one direction.
Quick Layout Checklist (Print-and-Plan)
| Area | Goal | Common Pitfall | Simple Fix |
|---|---|---|---|
| Town center | Strong focal point | Too many tall items clustered | Use one tallest building, lower surrounding props |
| Streets/paths | Natural flow for the eye | Straight lines that feel rigid | Add a curve, a bend, or a small roundabout |
| Edges/borders | Clean finishing and protection | Unfinished base edges show | Add trim, stone wall, hedges, or fencing |
| Height variation | Depth and realism | Everything sits on the same plane | Layer foam, use retaining walls, add steps/slopes |
| Negative space | Readability and balance | Every inch filled with objects | Leave a square, pond, green, or snowfield |
Select Materials and Tools That Match the Look (and the Mess)
Ventilation and cleanup are part of planning, not an afterthought—especially if you’re priming, sealing, or spraying. For basic guidance on airflow and indoor safety, the U.S. Environmental Protection Agency’s indoor air quality resources are a solid starting point.
Build in Stages: Base → Structures → Landscaping → Details
Landscaping Tricks That Make Miniatures Look Real
For depth, place taller elements toward the back and lower elements in front. This “framing” improves visibility and creates a natural sense of distance. If you want a quick refresher on what “scale” means across models and ratios, Britannica’s overview of scale is a helpful reference.
Lighting, Power, and Display Setup
Keep the Village Cohesive Over Time
Step-by-Step Planning Workbook (Digital Download)
If you prefer a structured approach, a workbook can reduce wasted materials by locking in scale, layout, and staging before construction begins. The Miniature Village Planning Guide eBook (digital download) walks through mapping the base, designing roads and elevation, selecting materials, and sequencing build tasks to avoid rework.
For builders who like printable checklists to keep phases on schedule, the Ultimate Checklist (printable PDF download) can also be repurposed as a simple progress tracker for “base, buildings, landscaping, details” milestones.
FAQ
What scale should a beginner choose for a miniature village?
Pick one common scale that matches the buildings and figures you can easily find, then stay consistent. Door and window heights, people, vehicles, and trees looking like they belong together matters more than the exact ratio. Starting with a small footprint makes it easier to learn placement and textures without getting overwhelmed.
How do you make a miniature village look less flat?
Add elevation changes early, layer vegetation from fine to coarse, and use taller elements toward the back for a subtle forced-perspective effect. Curved paths and planned negative space make the layout feel more natural, while weathering and small color shifts add visual depth.
What’s the easiest order to build a village without redoing work?
Build in stages: base contours first, then roads and hardscape, then buildings, then landscaping, then micro-details and lighting touches. Early test-fitting prevents glued-in mistakes and keeps delicate greenery from getting crushed while you’re still adjusting streets and placements.
Recommended for you

Forgive Yourself for Wasted Time: 5 Steps That Work
Sep 18, 2026













Leave a comment